In March of 2009, I acquired an IMSAI 8080 system along with a box of 8" diskettes and a pile of S-100 boards. The previous owner had heavily customized the system, both hardware and software. The boards installed in the IMSAI were:
I cleaned up the system and carefully reformed the huge electrolytic capacitors in the power supply. I reinstalled a minimum set of boards (CPU, RAM, terminator) and was able to toggle in and run a short program via the front panel switches. I then installed the floppy controller and connected the dual DS 8" drives which came with the system. But, where to connect the console terminal? Between the Disk Jockey, IO-4 and home-brew I/O board, there were about 5 serial ports. I decided to try and get the system to boot using the serial port on the Disk Jockey card.
According to the labels, several of the disks seemed to be system disks. Picking a couple of likely looking disks, I attempted to boot CP/M but saw no activity at all on the A: drive. At that point, I put the system aside until a later date.
When I came back to the IMSAI, I eventually found that the A: drive had a dead short across the 24V power connection which was dragging down the power supply for both drives (thank goodness for current limiting). I unplugged the A: drive and reconfigured the 2nd drive as A:, and was rewarded with the drive selecting, stepping, and appearing to load the boot tracks. Nothing on the terminal though, so I tried all the other serial ports, with and without a null-modem adapter. Still nothing.
In the collection of extra S-100 boards were two video boards: a Processor Technology VDM-1 and a Dynabyte Naked Terminal. I tried each of them in turn, with a composite monitor connected. The VDM-1 stayed blank, but the Dynabyte displayed a scrambled boot message which was enough to tell me that CP/M on that diskette was built for the Dynabyte. However, there was no documentation for the board and it apparently used a parallel ASCII keyboard which was also missing. In addition to the scrambled text, the screen was filled with comma characters. I decided to continue to try and get CP/M reconfigured to use the serial port on the Disk Jockey.
Before doing anything with the diskettes, I imaged them with Dave Dunfield's IMD utility. I have an older Pentium system set up with an external DS 8" drive running the FreeDOS LiveCD. The floppy controller properly supports single-density disks, which was necessary because the first track on all the disks has 26 sectors of 128 bytes in FM format, the standard format for 8" CP/M disks. However, some of the disks are FM on all tracks, and some of them are a combination of 8 or 9 1024-byte sectors in MFM format. The 8x1024 layout was common for Morrow controllers, but the 9x1024 layout was done by the system's former owner, who customized the CBIOS.
I extracted the system tracks (0 and 1) from one of the disk images with IMDU (part of IMD) to a binary image. I then imported that image into my preferred TRS-80 emulator, sdltrs, running Montezuma Micro CP/M 2.2 in Model 4 mode. MMCPM was my usual working environment back in the '80s when I was hacking Z80 code. I installed an interactive Z80 disassembler called DazzleStar, which uses a Wordstar-like interface. I then used DazzleStar to locate the CBIOS in the boot image and disassembled enough of it to figure out where the CONIN, CONOUT and CONIST routines were located.
My first thought was to patch in the routines to access the serial port on the 2D/B over top of the Dynabyte code. I used the IMDV utility (from IMD) to edit the full disk image and patched in the console access routines, then wrote the modified image back to disk with IMD. On booting the IMSAI, I was rewarded with a boot message on the terminal, but all of the characters were doubled. Console input required two keypresses for each key (including <RETURN>).
I took a closer look at the code and discovered I needed to initialize the 2D/B serial port before use. I patched in that code using the same procedure and this time, the system booted with a normal display. But, the system wouldn't take input from the keyboard, and appeared to be stuck in a loop in an area I thought was disabled. At this point, I decided on a different approach which eventually succeeded.
Using a hex file viewer, I browsed through the directory areas of the system disks I had imaged and found one that appeared to have source code on it. I now turned to the cpmtools suite for Linux, which allows you to access disks and disk images for which it has a format. This particular disk had a format of 26 128-byte sectors on track 0, followed by 76 tracks of 9 1024-byte sectors. Cpmtools can only handle images with the same number of sectors on each track, so I had to construct a suitable image. I used the standard Unix dd utility to create a set of blank boot tracks:
dd if=/dev/zero of=tracks01.bin bs=1024 count=18
I then used the dosbox emulator under Linux to run the IMDU utility to extract track 0, track 1 and tracks 2-76 to three separate binary image files:
    IMDU EXTSYS.IMD TRACK0.BIN /B X=1,76
    IMDU EXTSYS.IMD TRACK1.BIN /B X=0 X=2,76
    IMDU EXTSYS.IMD TRACK2.BIN /B X=0,1
Back in Linux I added a custom drive definition for cpmtools in /usr/share/cpmtools/diskdefs:
    diskdef morrow-9x1024

	seclen 1024
	tracks 77
	sectrk 9
	blocksize 1024
	maxdir 128
	skew 3
	boottrk 2
	os 2.2

    end
I then reconstructed a homogenous binary image:
cat tracks01.bin TRACK2.BIN > IMAGEX.BIN
I was then able to use the cpmls command to read the directory of the reconstructed disk image:
cpmls -l -f morrow-9x1024 IMAGEX.BIN
The directory list is divided into sections, according to the USER area. In this case, files were stored under both USER 0 and USER 1. I then used the cpmcp utility to extract the files from the image to a single directory:
    cpmcp -f morrow-9x1024 IMAGEX.BIN "0:*.*" newdir/
    cpmcp -f morrow-9x1024 IMAGEX.BIN "1:*.*" newdir/
Among the interesting files in USER 1 were:
    MZBOOT.ASM	    boot loader
    MZBIOSDS.ASM    CBIOS 3.1 for the 2D/B with Dynabyte Naked Terminal
    MZCPR.ASM	    ZCPR CCP replacement
This disk turned out to be a treasure trove, with disk formatting and copy programs and other useful utilities. Armed with the CBIOS source, I rewrote the relevant sections for the 2D/B serial port and removed the driver for the Scitronics real-time clock board. I imported the source file into sdltrs and used ASM.COM to assemble it at origin EB00H, the same location as the old CBIOS. I exported the resulting MCLBIOS.HEX file to Linux and used a Unix utility called hexcom to create a binary file of the new CBIOS:
hexcom < MCLBIOS.HEX > MCLBIOS.BIN
I wrote a quick-and-dirty binary patcher to load the new CBIOS into its proper place on the track 1 binary image:
binpatch TRACK1.BIN MCLBIOS.BIN 4352
The last parameter is the offset into the file (1100H). Next, I concatenated the track 0, patched-track 1 and track 2-76 files into a single binary image:
cat TRACK0.BIN TRACK1.BIN TRACK2.BIN > EXTSYSM.BIN
Back to dosbox, I used the BIN2IMD (from IMD) command to turn my modified image back into an IMD file. First, I created an option file (EXTSYSM.B2I) to describe the disk format:
    ; IMSAI 8" disk for Morrow Disk Jockey 2D/B
    ; Track 0 SSSD 26 sectors
    0 N=77 DM=0 SS=128 SM=1-26 /1
    1 DM=3 SS=1024 SM=1-9
Then, ran the command:
BIN2IMD EXTSYSM.BIN EXTSYSM.IMD EXTSYSM.B2I
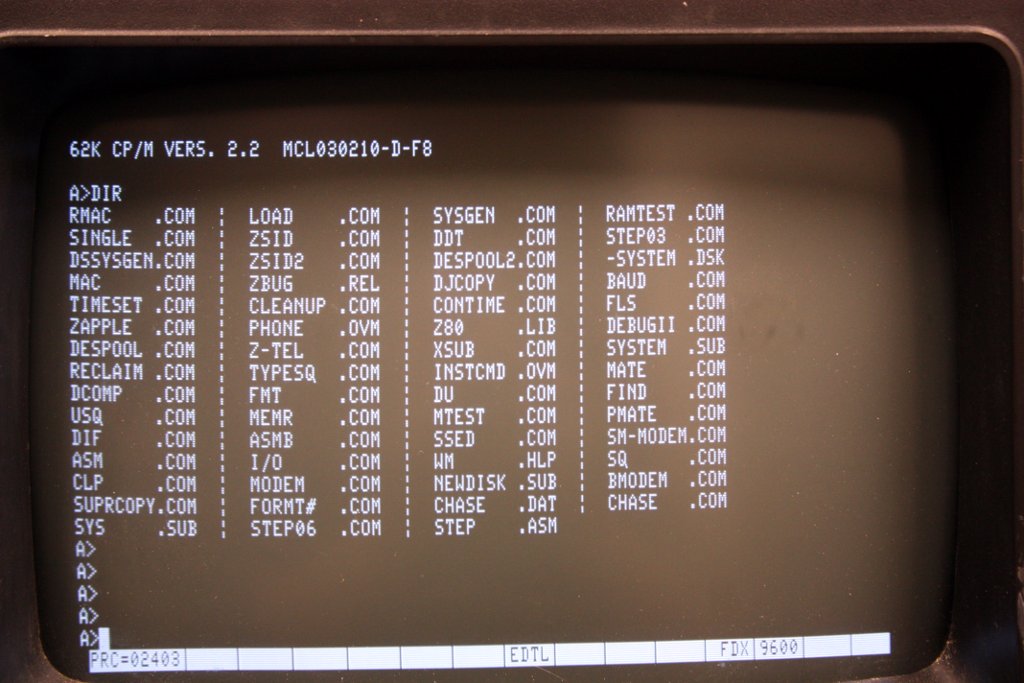
Finally, back to my FreeDOS station to write the IMD image to a diskette. It worked! Console input and output is normal, and I have a functional CP/M system again.
This whole exercise was only possible because I had bootable disks for the system, albeit for a different (non-working) hardware configuration. If I had to start from ground zero, I may have tried Rich Cini's method using a monitor ROM to build up a working CP/M boot disk.
Along with the linked utilities listed above, the following resources were very helpful:
![]()
![]()